Tap, tap, tap. Are those your puppy’s nails tapping on the floor? If so, it’s time to trim those babies! Unlike our trips to the salon for a fresh coat of polish, pawdicures aren’t cosmetic. When a dog’s nails tap on hard surfaces, it pushes their nails up into their nail beds, which can be painful. Not only does it put pressure on the toe joints, but it can also force the toes to twist to the side, resulting in soreness or even arthritis.
Before you grab the clippers and start trimming, let’s chat about basic nail anatomy. I know that doesn’t sound too fun, but it’s important.
What’s Inside Your Dog’s Nails?
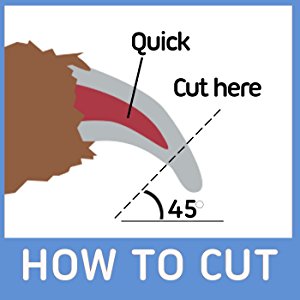
The hard, outer part of your puppy’s nails is called the shell, and inside is a pink nerve called the quick. The quick supplies blood to the nail and, during trims, your goal is to leave the quick fully intact. If you cut this part, you’ll immediately hear your dog shriek in pain and you’ll see blood.
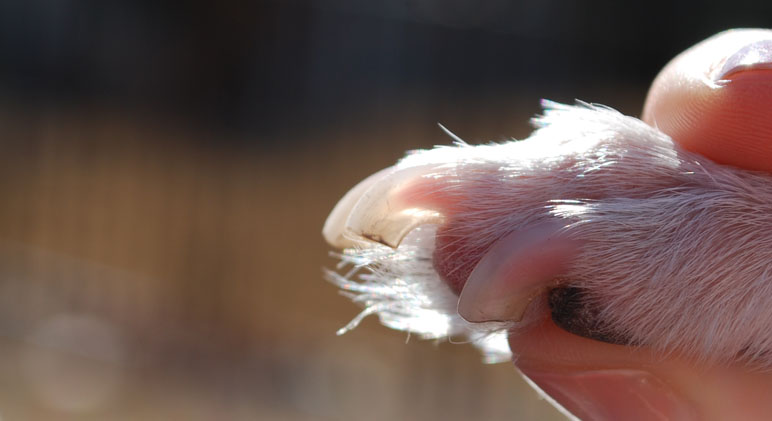
If your dog has white nails then it’s pretty easy to spot the quick (as you can see in the photo below). Over time, you’ll notice regular nail trims cause the quick to recede (short quicks are ideal). If your dog has black nails, though, you won’t see the quick through the shell. This certainly makes trims a bit more complicated, but not impossible.
Below, I have included two different sections for clipping white nails and clipping black nails.
Tools
If your dog regularly walks and plays on rough surfaces—like concrete—you may not have to cut his nails often, since the hard surface will wear them down naturally. With that said, most dogs need a nail trim every two to four weeks.
To trim your dog’s nails you’ll need:
Good High-Quality Set of Dog Nail Clippers or a Dremel – A high-quality set of dog nail clippers can make a huge difference. Cheap clippers can leave your dog’s nails cracked and crooked. When looking for a quality clipper, you’ll notice two different styles: scissor-style (which works like a pair of scissors) and guillotine-style (where a blade lowers and slices off the nail). I personally prefer the scissor-style clippers.
If you and/or your dog is extremely afraid of the clippers, you may prefer using a Dremel, which is a tool that grinds your dog’s nail. For my Chihuahua, I use regular scissor-style clippers, but my Poodle is way more cooperative with the Dremel. She just prefers the feeling.
*Find out how to use the grinder tool in the video under the “Cutting Black Nails” section. The video highlights Dremels at the 5-minute mark.

Styptic Powder/ Cornstarch – If you accidentally cut too far, this will help clot the quick and stop the bleeding. This is the one I keep on hand:
Nail File – If you use a traditional clipper versus a Dremel, you may feel some sharp edges leftover on your dog’s nails. Use a nail file to smooth them.
Getting Your Dog Comfortable
I know “hate” is a strong word, but a lot of dogs hate having their paws touched. So, if you have a young puppy on your hands, this is the perfect time to desensitize. Here are some tips to get your dog more comfortable with you handling his paws, and ultimately clipping his nails.
- From the first day you bring your puppy home, frequently touch and hold their paws. If your pup seems relaxed, give him a treat.
- Before clipping your puppy’s nails, show him the clipper or grinder. Let him sniff and explore, and give him a treat and praise for doing so.
- Next, gently touch the clipper or grinder (turned off) to each paw. Give a treat and praise. Repeat this step several times.
- Once your dog seems comfortable with the last step, place the clippers around their nail, but don’t actually clip. Remove and give a treat and praise. If you’re using a grinder instead of clippers, turn it on quickly so your pup can hear its sound. Only keep it on for a few seconds and don’t actually touch it to your dog’s nails. Give a treat and praise.
- Try trimming one nail, clipping off just a small piece to get your dog used to the feeling. Give a treat and praise. Don’t rush this process and work your way up to a full nail trim!
Cutting White Nails
- Hold your dog’s paw firmly, but gently.
- Place clippers around the tip of your dog’s nail – below the quick at a 45º angle.
- Double-check that the clippers aren’t on top of the quick. If you’re in the clear, snip off the tip of the nail.
- If your dog’s nail starts bleeding that means you hit the quick. If this happens, immediately press your dog’s nail into a bottle of styptic powder to clot the cut.
- Don’t forget to cut the dewclaws (if your dog has them).
- Lightly file your puppy’s nails to eliminate any sharp edges.
- Reward your pooch with treats and affection.
Cutting Black Nails
While cutting white nails is typically done with one cut per nail, that’s not the case for black nails. The trick is to make several very shallow cuts, pausing between each one to check the cut surface. If the cut surface appears whitish, it’s safe to trim a little bit more. When you’re about to approach the quick, the nail’s center will appear black. So, once you see black at the cut surface, stop!
Since it’s easier to see a visual aid, I have included a great video that highlights cutting black nails. *Note: I am not in this video, nor did I create this video. I just think it has some great tips:
Remember: Always finish up your nail cutting session with plenty of treats and praise!
Grinding Nails
- Hold your dog’s nail firmly, but gently.
- Turn the grinder on and place it on the bottom of your dog’s nail. Lightly apply pressure.
- Remain mindful of any sensitivity and frequently remove the grinder to check your progress.
Happy nail trimming!